Category: What’s Causing My Leak?
-
Uncovering Roof Leaks from Inside: A Step-by-Step Guide

A roof leak can quickly escalate from a minor annoyance to a major problem, causing significant damage to your home if left unaddressed. Detecting the source of a roof leak can be challenging, especially during heavy rain or when the damage is not visible from the exterior. However, with a systematic approach and a keen…
-
5 Common Problems with Gutters and How to Address Them

Gutters are a crucial part of any home’s drainage system. They play a vital role in channeling rainwater away from the roof and foundation, preventing potential water damage and costly repairs. However, gutters are susceptible to various issues that can compromise their functionality and effectiveness. In this blog post, we’ll explore five common problems with…
-
Common Roof Culprits: Exploring the Top 10 Causes of Roof Leaks

Roof leaks can occur due to various reasons. Here are some of the most common causes of roof leaks: It’s important to promptly address roof leaks to prevent further damage to your property. If you suspect a roof leak, it’s recommended to consult a professional roofer for a thorough inspection and appropriate repairs.
-
Roof Leak Worries? Find the Best Roofer Near You for Reliable Repairs!

A roof leak can be a serious issue that should not be ignored. Even a small leak can lead to significant damage over time, including water damage to your home’s structure, insulation, and interior finishes. Mold growth and electrical hazards may also arise from prolonged exposure to moisture. Therefore, it’s important to address a roof…
-
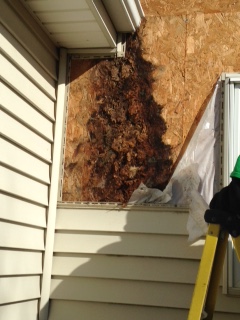
Kick-Out Flashings

A frequent hotspot for leaks are where the roofline hits a siding wall. No matter how close the gutter is to the wall there is always a gap that water can squeeze into. Over time the water can find weaknesses or small areas to make it through. This can cause leaks and sheeting rot over…
-
Skylight Replacement After A Hail Storm

The past year, Central Illinois was filled with some very intense hail storms. Many homeowners that receive insurance money to replace hail damage find themselves asking, “My skylight doesn’t look damaged and isn’t leaking, should I still replace it?” The answer is always “Yes!” Here’s why: Your roof is somewhat built to accept and resist…
-
Humidity Gone Rogue

Rogue : a deceitful and unreliable scoundrel. Seems funny to apply the word “rogue” to humidity. But during midwest winters it fits. Here’s why: Every winter is bound to have a couple days to a couple weeks of below zero weather. When temperatures start to rise, homeowners start to notice brown spots on their ceiling…
-
Water Management

Uncontrolled water is the biggest threat to homeowners. It’s a slow and silent killer. Here are the most common issues we see on homes. Lack of Kick-Out Flashings. Even if your gutters are pitched correctly and don’t leak, they may appear to be leaking where the gutter butts up the wall. Or it might look like…
-
The Importance of Kick-out Flashing
Spring showers bring leaky gutters- Wait no, that’s not right! We’ve recently had a fair amount of homeowners call because they are tired of leaking gutters. It’s usually the lack of kick out flashing which gives the appearance of a leaky gutter but often has hidden disasters associated with it. What is a kickout flashing?…
-
Leaking Roof? Could Be an Easy Fix

Have you noticed a wet or tea-stained ceiling? It could be from a bad or old pipe flashings. The usual life span of a pipe flashing is 10-15 years but depends on your region’s weather conditions. If you keep an eye on all of your pipe flashings it could save you hundreds of dollars repairing any interior…